Xserver VPSのイメージで作ったMisskeyの立ち上げ方法
/ 4 min read
Table of Contents
はじめに
Xserver VPSのイメージで作ったMisskeyの立ち上げ方法をまとめてみました。
方法
前提
VPS: 2GB プラン ドメイン: Xserver ドメイン(ネームサーバーは Xserver のレンタルサーバーを指定)
Ubuntuの初期設定
Misskey 自体をセットアップする前に、Ubuntu のセキュリティ設定をやっておきます。
Xserver の VPS で root を禁止して SSH も 22 番以外のポートに変更する方法
セットアップ準備
まずはMisskey アプリイメージを利用するの 「Misskey サーバー情報の確認」まで進めます。
VPSにドメインを紐付ける
前提に記載した通り、今回は Xserver のレンタルサーバーをネームサーバーにしているドメインを使用するため、 レンタルサーバーの DNS レコード設定から DNS レコードを追加していきます。
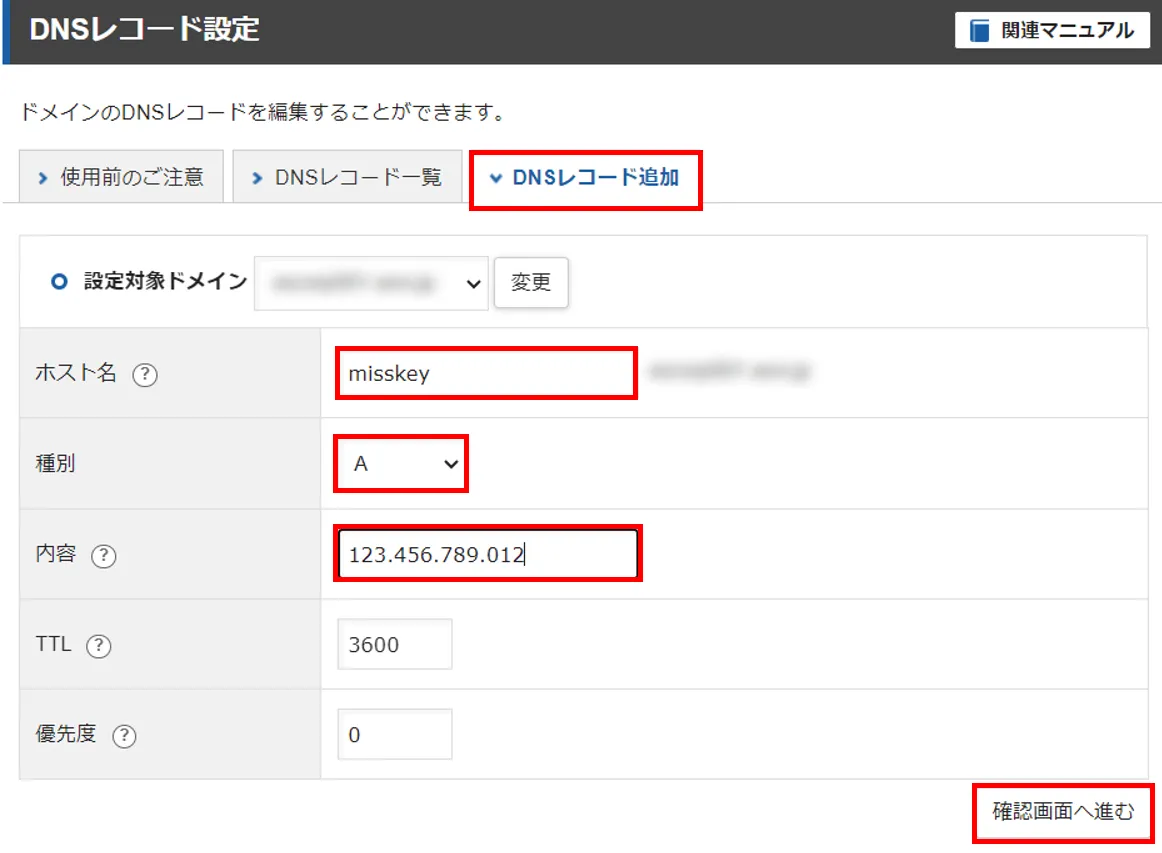
ホスト名: サブドメインを設定したい場合は入力する
種別: A
内容: Xserver VPS の IP アドレスを入力(VPS パネルのトップページで確認できます)
TTL と優先度はデフォルトのままで OK
これでしばらく待った後に、http://ホスト名:3000で変わらず Misskey にアクセスできることを確認できれば OK。
TLS証明書の設定
再びMisskey アプリイメージを利用するに戻り、
「SSL/TLS 手順」の部分を進めていきます。
ポイントは、以下の画面が出た後に、すぐ Enter を押さないことです!
このメッセージが出た後、再びレンタルサーバーの DNS レコード設定に行き、次の設定をします。
Saving debug log to /var/log/letsencrypt/letsencrypt.logRequesting a certificate for example.com
- - - - - - - - - - - - - - - - - - - - - - - - - - - - - - - - - - - - - - - -Please deploy a DNS TXT record under the name:
_acme-challenge.example.com.
with the following value:
xxxxxxxxxxxxxxxxxxxxxxxxxxx
Before continuing, verify the TXT record has been deployed. Depending on the DNSprovider, this may take some time, from a few seconds to multiple minutes. You cancheck if it has finished deploying with aid of online tools, such as the GoogleAdmin Toolbox: https://toolbox.googleapps.com/apps/dig/#TXT/_acme-challenge.example.com.Look for one or more bolded line(s) below the line ';ANSWER'. It should show thevalue(s) you've just added.
- - - - - - - - - - - - - - - - - - - - - - - - - - - - - - - - - - - - - - - -Press Enter to Continue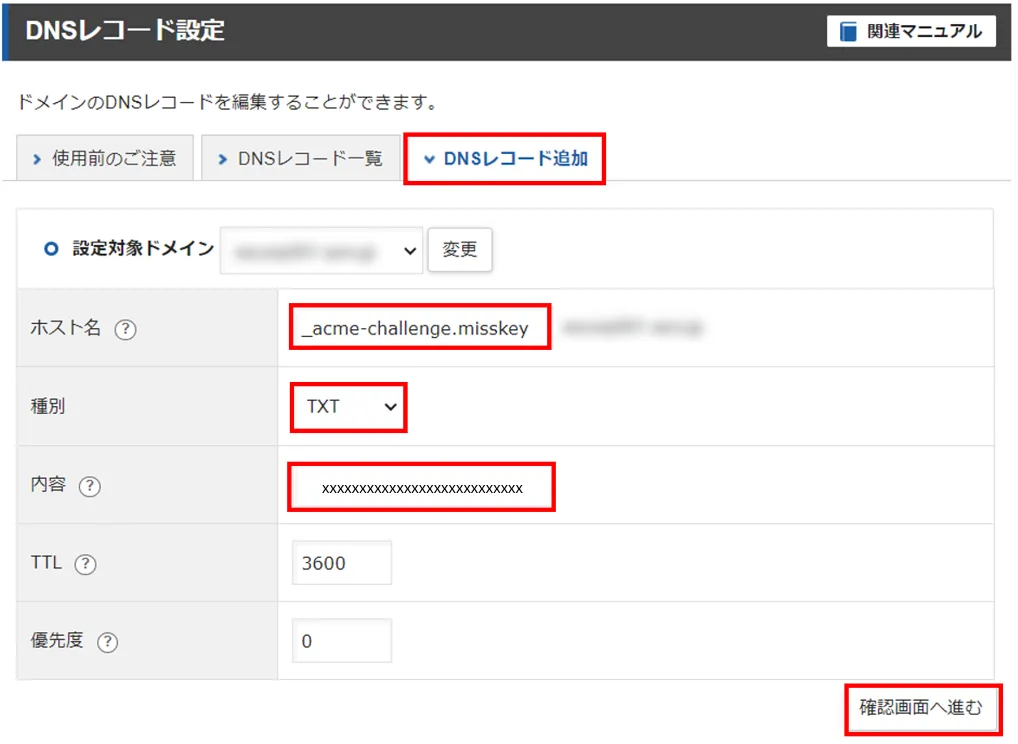
ホスト名: 「_acme-challenge.サブドメイン」を入力する
種別: TXT
内容: with the following value:の後の文字列を入力する
TTL と優先度はデフォルトのままで OK
DNS レコードの追加完了後、コンソールに戻り、Enter を押して進めます。
TLS証明書の自動更新
Misskey アプリイメージを利用するに戻り、
「TLS 証明書の自動更新」の部分です。
vim などで編集しましょう!
$ vim /etc/cron.d/letsencrypt-renew# -> 0 0 1 * * root certbot renew --pre-hook "service nginx stop" --post-hook "service nginx start"Nginx設定
設定も最後に近づいてきました。Misskey アプリイメージを利用するに戻り、
「Nginx 設定」の部分です。
設定後、https://ホスト名にアクセスできることを確認します。
Misskeyのコンフィグ設定
これが最後の設定です。
$ vim /home/misskey/misskey/.config/default.yml# -> url: https://example.tld/ となっている部分を設定したホスト名に変更する最後に色々再起動
これで完了です。
$ reboot$ systemctl restart cron$ systemctl restart nginxおまけ
nginx の自動起動設定
# 自動起動の設定$ sudo systemctl enable nginx
# 自動起動の解除$ sudo systemctl disable nginx